

Ever opened Google Search Console and instantly felt lost? All those charts and numbers—it can look intimidating, right? I’ve been there too, staring at data that seemed meant for “tech geniuses” only. But honestly? Search Console is my go-to secret for boosting website rankings—no coding required. It helped me spot the exact pages Google was ignoring and showed me which keywords actually bring in visitors.
In this guide, I’ll walk you through how to make Search Console work for your site, step by step—even if you’ve never touched a line of code. Ready to see what you’ve been missing? Let’s dive in!
What Exactly Is Search Console—and Why Should You Care?
Honestly, when I first heard about Search Console, I was just as confused as anyone else. It sounded super technical—like something meant for coders or “real” SEOs.
But here’s the truth: Search Console is way easier than it looks! No coding required. It’s a free tool that helps you watch over your site, fix issues, and show Google what matters.
I still remember the first time a tiny alert in Search Console helped me notice one of my key pages was invisible to Google. A quick fix, and the traffic came pouring back. If I’d ignored it, I’d still be missing out.
Long story short: Search Console is a simple key, and anyone running a website should keep it close.
What Are the Uses of a Search Console in SEO?
Track Traffic & Keyword Performance
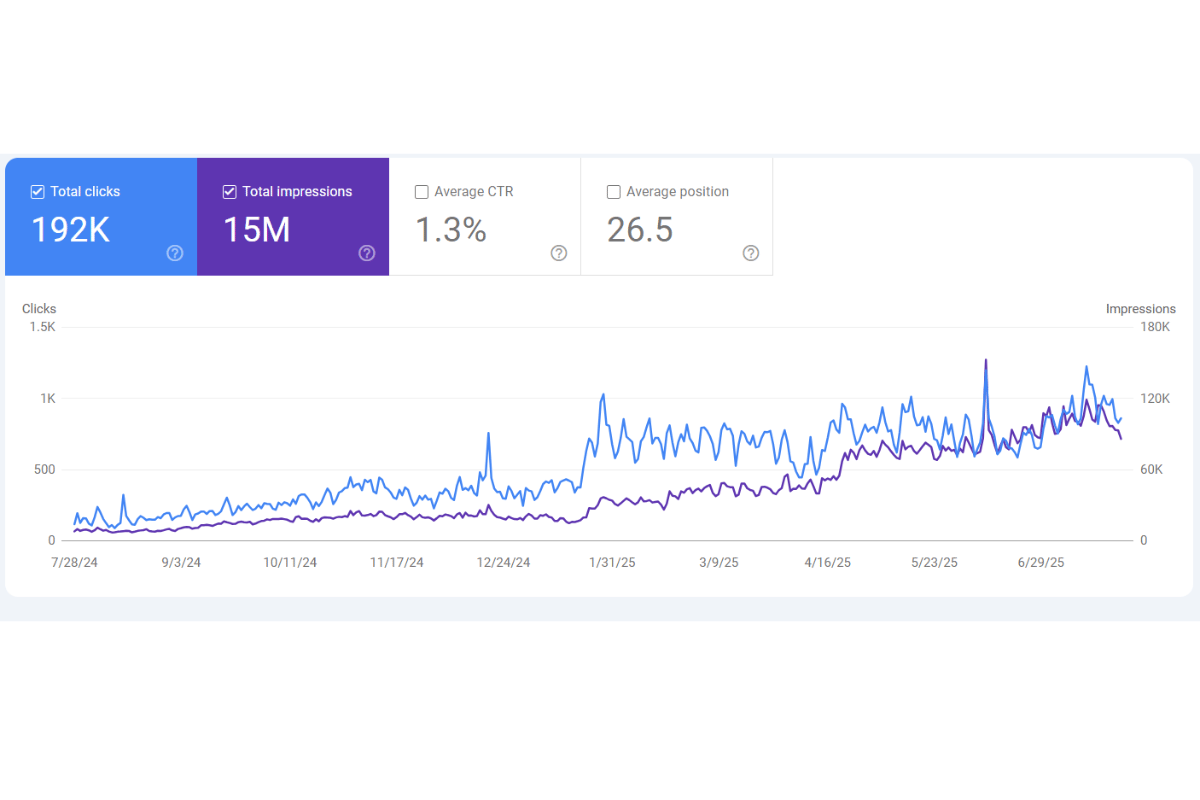
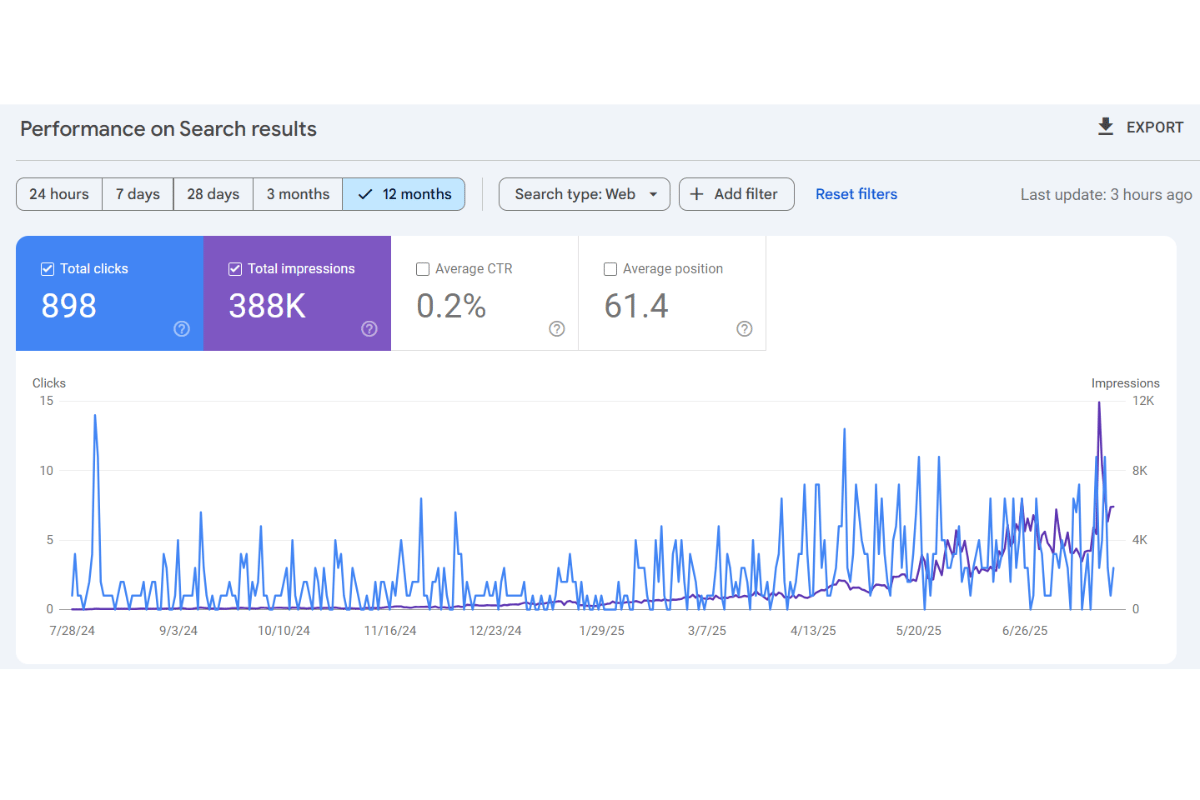
No more guessing—Search Console gives you exact numbers for which pages pull in visitors and which search terms land folks on your site. It’s the difference between blind blogging and focused, results-driven content.
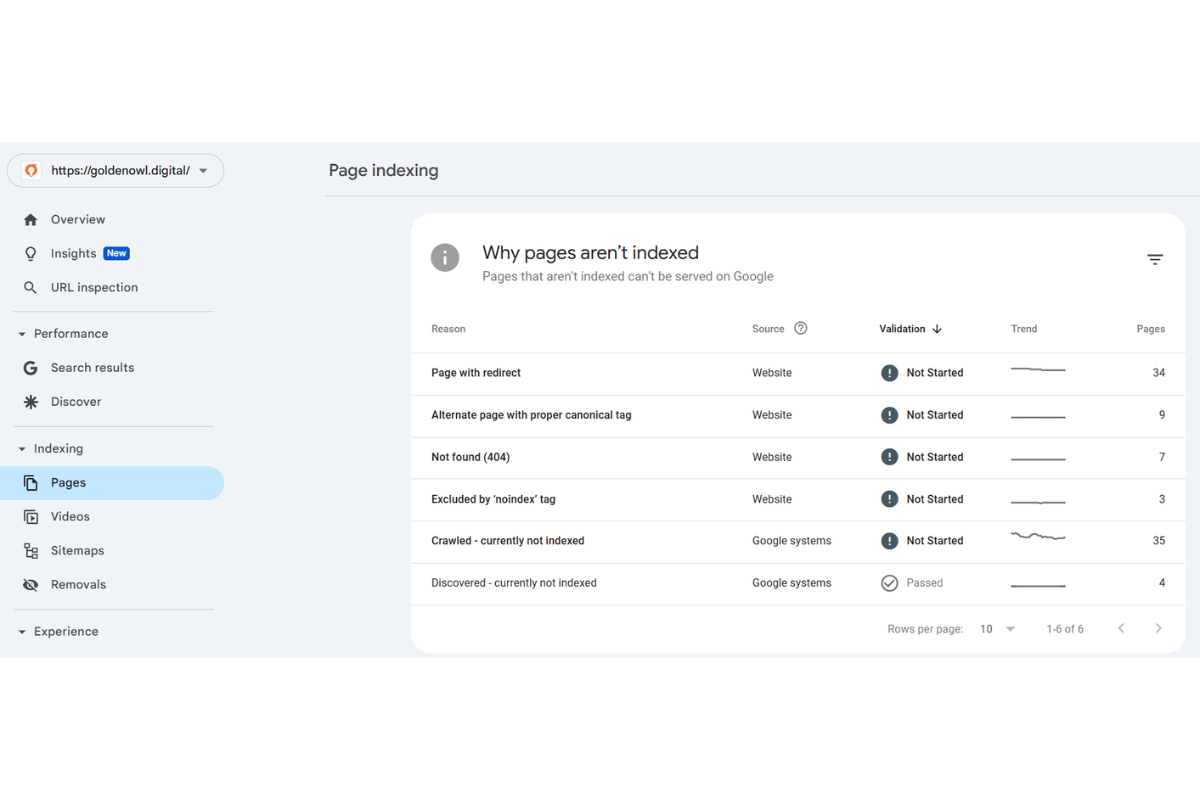
Discover & Fix Technical Issues
It only takes a small indexing error to hide your site from Google. Search Console flags these problems—like indexing, mobile warnings, or sitemap mishaps—so you can fix what matters, fast.
If you want to go beyond just spotting issues and learn exactly how to conduct a thorough SEO technical audit—covering everything from crawl errors to website speed and security—this guide on How to Do a SEO Technical Audit is a must-read
See Which Pages Google “Sees”—and Which Ones It Ignores
After publishing, I always check if Google’s indexed my post. If something’s left out, I can tweak and resubmit, making sure my work actually gets found.
Monitor Backlinks & Build New Ones
Who’s linking to you? Search Console shows your most valuable backlinks—and even spots questionable ones. I once found a forum featuring my site, reached out, and built an even stronger relationship. That’s how you grow authority, not just hope for good luck.
Reveal New Content Opportunities
My favorite hack: Search Console uncovers the real queries people use to find your site—including the gems you’d never think to target. Every time I check this, I get new ideas for posts that meet actual demand.
Remove Outdated or Unwanted Content from Search Results
Got old or irrelevant pages cluttering your search presence? Use GSC’s removal tools to clean house and keep your search results fresh and focused on what really matters.
Think of Search Console as your personal scoreboard and early warning system—no tech wizardry required. A quick check each week can make all the difference.
Real Story: How Search Console Helped Me Fix a “Discovered – Currently Not Indexed” Error
I once published what I thought was the perfect article. Weeks passed—no Google appearance. Then I checked Search Console: “Discovered – currently not indexed.” Ugh, like throwing a party and no one showed up.

But with Search Console, I saw exactly what was wrong. Turns out, my auto Table of Contents was generating too many unnecessary internal links, so Google wasn’t prioritizing my new post.
I cleaned up the Table of Contents, cut down the links, and resubmitted. Days later, my status switched to “Submitted and indexed”—and traffic started rolling in.
Bonus: a long-tail keyword in that post pulled in visits before my main keyword did. If I hadn’t checked, I’d probably still be waiting and wondering.
Moral of the story? Always follow up with Search Console after hitting publish. It saves you days of guesswork and helps unlock quick wins.
Let me know which section you want to sharpen next—or if you want to continue with more sections in this style!
6 Things I Wish I’d Known Sooner About Search Console
Not every 301 or 404 status is a red flag.
At first, I saw these statuses in the Coverage report and panicked, thinking every one was a big problem to fix immediately. But over time, I realized many are just normal signals—301 redirects mean pages are moving, and 404s often show outdated or purposely removed pages.
They’re not errors to fear but clues to understand how your site is evolving. It’s good to keep an eye on them, but don’t stress about every single one.
Submitting your sitemap doesn’t guarantee instant indexing.
At first, I thought once I submitted the sitemap, new pages would just appear on Google. Not true! You still need to check the Coverage report regularly—sometimes your pages get ignored, and it pays to catch that early.
You don’t need to be a techie to use it well.
I was scared I’d have to know code, but honestly, it’s just some smart clicks and reading simple reports. Search Console really is designed for beginners.
You’ll discover weird keywords bringing in traffic.
I spotted search terms in Search Console that I’d never see in other SEO tools. Thanks to that, I started writing posts outside my usual plan and watched my traffic climb.
Even a small warning can save your site.
Sometimes a minor redirect or slow image drags down your whole site. Search Console catches the little things—after fixing one of these, my rankings recovered noticeably.
Regular check-ins prevent big headaches.
I used to ignore Search Console for weeks—bad idea! I lost traffic just because of overlooked errors. Now I do a five-minute review every week and feel way more in control of my site’s health.
If I’d realized these five things from the start, I would’ve saved so much trial and error (and a few heartbreaking drops in traffic). Don’t repeat my mistakes—make Search Console your best SEO habit from day one!
Setting Up Google Search Console for Your Website (Super Simple!)
Head to Google Search Console
Go to the Search Console homepage and sign in with your Google account. Click “Add property” and pop in your full website URL.
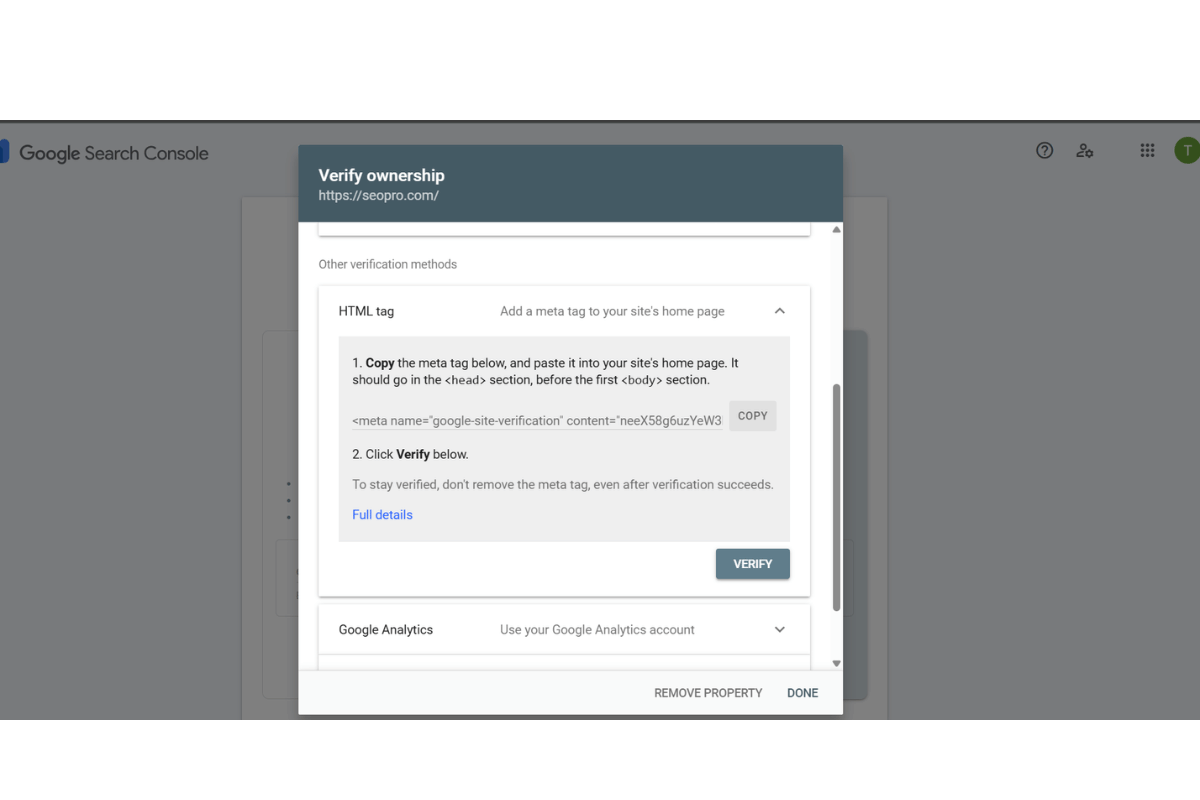
Pick Your Verification Method
Choose one verification method:
-
HTML File Upload: Download a file from GSC and upload it to your website’s root directory.
-
HTML Tag: Copy a meta tag GSC provides, then paste into your site’s <head> section.
-
Google Analytics or Google Tag Manager: If these are already installed on your site (and you use the same Google account), just confirm.
-
Domain Name Provider: Log in directly from GSC to your registrar and GSC will verify.
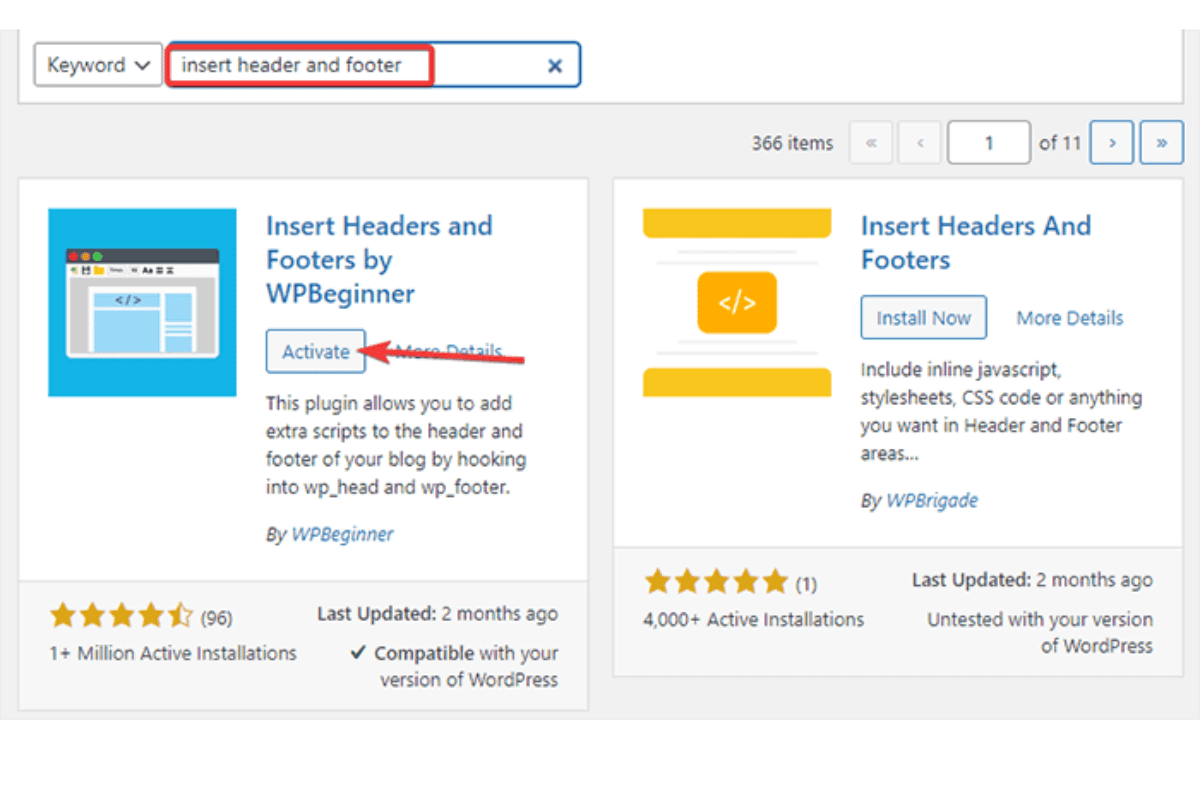
In my case (also the easiest in my opinion), you copy the HTML tag above and paste it into the header. Where is header you may ask? First you need to download a plugin like Code Snippet or Insert header and footer (like the picture below). Then navigate to the header section and paste your code there.
Click ‘Verify’ and Celebrate
Once you’ve added the code or file, hit the “Verify” button back in Search Console. If all’s well, you’ll see a success message. High five!
(Optional but Recommended) Submit Your Sitemap
Head to the “Sitemaps” section and add your sitemap URL—usually something like yourwebsite.com/sitemap.xml. This helps Google discover new pages faster.
That’s it. Don’t stress if it all feels a bit new—most of these steps are one-time-only, and Search Console will remember your site from here on out.
Honestly, I once thought, “What are the uses of a search console in SEO, really?”—until I actually dug in and saw how much easier it made my life.
If you’re still wondering what are the uses of a search console in SEO, let this be your nudge: open it, pick one report, and watch your website quietly get better. If I can do it, you absolutely can, too.

Jaden is an SEO Specialist at Golden Owl Digital. He helps brands rank higher with technical SEO and content that resonates